Contents:
- Why More People Are Learning How to Cut Their Own Hair Short
- Essential Tools for How to Cut Your Own Hair Short
- Clippers and Guards
- Scissors and Thinning Shears
- Mirrors and Lighting
- Other Essentials
- Step-by-Step Instructions: How to Cut Your Own Hair Short
- Preparation: The Hour Before You Cut
- Starting with Clippers: The Fade or Base
- Tackling the Top: Scissors Work
- The Finishing Details
- Common Mistakes When Learning How to Cut Your Own Hair Short
- Cutting When Hair is Dry
- Using Dull or Wrong Tools
- Rushing the Blending
- Failing to Account for Hair Growth Patterns
- Not Checking Your Work Frequently
- Cost Breakdown: What You’ll Actually Spend
- Seasonal Maintenance Timeline for Short Hair
- Spring (March-May)
- Summer (June-August)
- Autumn (September-November)
- Winter (December-February)
- Building Confidence: Your First Three Cuts
- Frequently Asked Questions
- Can I cut my own hair short if I have curly hair?
- What’s the safest short style for a first-time DIY cut?
- How often should I replace clipper blades?
- Is it possible to fix a bad haircut at home?
- Can I use regular kitchen scissors instead of barber scissors?
- Moving Forward: Making It Your Routine
Short hair requires courage. Most people believe you absolutely need a professional stylist to achieve a decent short cut, yet thousands of people cut their own hair at home every week. This misconception costs people hundreds of pounds annually in salon appointments when, with the right approach, cutting your own short hair is entirely achievable.
The truth is simpler than you might think: short hair is often easier to manage than longer styles because mistakes are less obvious and hair grows back quickly. Whether you’re trimming a fade, maintaining a pixie crop, or trying a choppy bob for the first time, this guide will walk you through everything you need to know about how to cut your own hair short with confidence and precision.
Why More People Are Learning How to Cut Their Own Hair Short
The economics are compelling. A professional short haircut in the UK costs between £25 and £60, depending on your location and salon. If you visit every six weeks, that’s £200 to £480 per year. By learning to maintain your own short hair between salon visits—or doing the entire cut yourself—you recoup the cost of quality clippers and scissors within a few months.
Beyond finances, the flexibility matters. You’re not dependent on booking appointments or waiting weeks for availability. On a Tuesday evening when you notice your fade growing out, you can touch it up immediately. This practical advantage has driven growing interest in at-home hair cutting techniques since 2024, with online tutorials and community forums dedicated to DIY hair maintenance attracting thousands of participants monthly.
Environmental considerations add another layer. Professional salons use water, electricity, and products for every appointment. Cutting at home reduces that footprint significantly. You’ll also generate less packaging waste since quality clippers and scissors last years, unlike single-use salon products. Many people who commit to cutting their own short hair report feeling more connected to their appearance and maintenance routine.
Essential Tools for How to Cut Your Own Hair Short
You cannot achieve good results with unsuitable equipment. Professional-quality tools make the difference between a respectable cut and a patchy mess. Here’s what you actually need:
Clippers and Guards
A quality clipper machine is the foundation for short hair cutting. Expect to spend £30 to £80 on a reliable machine with adjustable guards. Brands like Wahl, Philips, and Panasonic manufacture durable clippers that remain accurate after hundreds of uses. Clippers come with numbered guards (typically ranging from 0.5mm to 25mm) that determine cutting length. For a number 2 fade, you use the number 2 guard; for blended sides, you’d use multiple guards in succession.
Never buy the cheapest clipper you find. Budget clippers overheat, have inconsistent blade alignment, and vibrate excessively. They create uneven lines and can pull hair painfully. Invest in mid-range clippers with good reviews on UK retailers like Amazon or Boots. Many last five years or more with basic maintenance—replacing the blade occasionally and cleaning after use.
Scissors and Thinning Shears
Even for very short cuts, you need quality scissors for detail work and blending. Professional barber scissors cost £20 to £50 for decent ones. They have a specific blade geometry that keeps hair from slipping. Kitchen scissors or dull craft scissors will fray the hair ends and create an unpolished appearance.
Thinning shears (also called texturising shears) remove bulk without shortening length, perfect for creating texture in short crops. They’re optional for very short fades but essential if you’re cutting a textured pixie or shaggy crop. A basic pair costs £15 to £35.
Mirrors and Lighting
You need clear visibility of the back of your head. A single bathroom mirror won’t work. Position yourself between two mirrors—one facing you and one behind—so you can see the back clearly. Alternatively, use your phone’s selfie camera pointed backward, which many people find surprisingly effective. Ensure your lighting is bright and even; poor lighting makes it impossible to judge whether your cut is level or blended properly.
Other Essentials
A spray bottle with water keeps hair slightly damp, making it easier to cut evenly. Dry hair becomes unpredictable—it springs up differently than when wet. A neck brush removes loose hair trimmings. Towels and a cape prevent hair from sticking to your skin and clothes. You can use an old pillowcase as a cutting cape if you don’t want to buy one.
Step-by-Step Instructions: How to Cut Your Own Hair Short
Preparation: The Hour Before You Cut
Preparation determines whether your cut looks intentional or accidental. Start with freshly washed hair, or dampen it thoroughly with your spray bottle. Hair should be damp but not dripping. Set up your mirror arrangement and lighting, positioning yourself comfortably so you’re not straining your neck.
Section your hair using clips. Divide it into quadrants: front left, front right, back left, back right. For clipper work, you’ll typically start with the sides and back, saving the top and front for last. This order lets you assess length and blend as you go.
Before you cut anything, stand back and look at your current hair length. Take a photo. This gives you a baseline and, crucially, provides evidence of what you started with if something goes wrong.
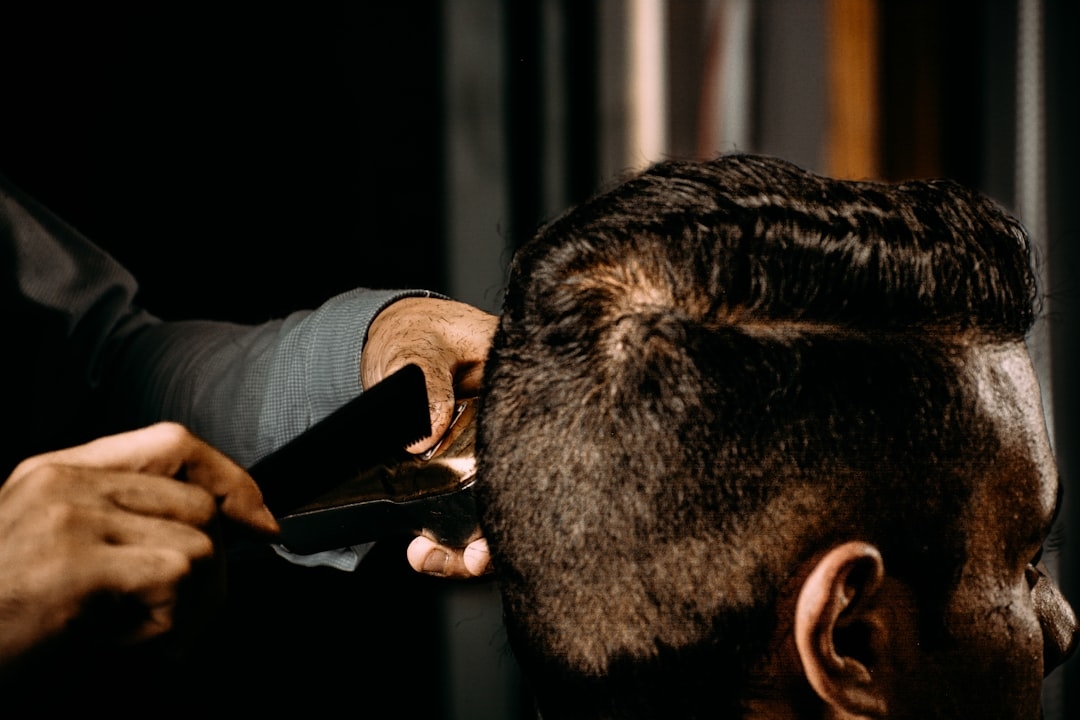
Starting with Clippers: The Fade or Base
If you’re aiming for a fade (progressively shorter from top to bottom), start with the shortest guard on the nape of your neck and lower sides. Use upward strokes, following the natural hair growth direction. The nape typically uses a number 1 or number 1.5 guard.
Work slowly and methodically. Run the clippers up the back of your head in vertical lines, slightly overlapping each pass. Do the same on both sides. This creates your foundation—the shortest part of the cut.
Next, switch to a slightly longer guard (number 2 or 2.5) and blend upward over the previous section. The key to a professional fade is overlap. Each guard length should blend into the previous one without harsh lines. Work slowly, checking your progress frequently by looking in both mirrors.
If you’re doing a uniform short cut rather than a fade, simply use one guard size across the sides and back. A number 2 or 3 is typical for a neat, short look that remains easy to maintain.
Tackling the Top: Scissors Work
Once the sides and back are done, move to the top. The top requires scissors, not clippers, because you’re blending different lengths and creating shape. Use slightly damp hair—it should spring back slightly when dry.
Comb the hair straight up and decide your desired length. For a short cut, you’re typically leaving 5-10cm on top. Grab a small section between your fingers and cut straight across, creating a guide line. Work section by section across the top, always comparing to that first guide line to maintain even length.
When you’re happy with the overall length, move to blending. Use scissors to taper the hair where it meets the clipped sides and back. Hold sections at angles and cut gradually, making small adjustments. This is where thinning shears become useful—a few careful snips with thinning shears removes bulk and creates a softer blend without visibly shortening the hair.
The Finishing Details
Step back and view the whole cut from multiple angles. Look for obvious uneven sections. Make small corrections using scissors. A good rule: trim only a small amount at a time. You can always cut more, but you can’t put hair back.
Let your hair dry slightly (or fully) and view the final result. Hair looks slightly different when wet versus dry due to weight and curl patterns. Many people prefer to wait an hour, let their hair dry naturally, and then make final adjustments with just scissors or thinning shears.
Common Mistakes When Learning How to Cut Your Own Hair Short
Nearly everyone makes mistakes the first time. Here’s what to avoid:
Cutting When Hair is Dry
Dry hair doesn’t behave predictably. Cowlicks become obvious, curls spring unpredictably, and your perception of length is unreliable. Always cut damp hair. It’s the single most important variable for consistent results.
Using Dull or Wrong Tools
Dull scissors bruise hair rather than cutting cleanly, leaving frayed ends that look scraggly. Clipper blades should feel smooth and cool, not hot or scratchy. If your tools feel wrong, sharpen or replace them before attempting another cut.
Rushing the Blending
A harsh line between clipped sides and scissored top looks amateur. Spend time blending with scissors, using thinning shears, and feathering the transition. Professional results come from patience during this stage, not from speed.
Failing to Account for Hair Growth Patterns
Everyone has a cowlick—an area where hair grows in an unpredictable direction, typically at the crown or front. When you cut against a cowlick, it sticks up. Cutting with it risks the section looking too short. Learn your cowlicks and plan around them. Slightly longer hair can hide problematic growth patterns.
Not Checking Your Work Frequently
Look in the mirror constantly. A five-second check every few passes prevents major mistakes. You’re building a shape gradually, and small adjustments are far easier than trying to fix a significantly uneven cut.
Cost Breakdown: What You’ll Actually Spend
The investment might surprise you. Here’s a realistic breakdown for starting from scratch:
- Quality clippers: £40-£75
- Professional barber scissors: £25-£40
- Thinning shears: £15-£30
- Mirrors (if you don’t have two already): £10-£20
- Spray bottle and accessories: £5-£10
- Total initial investment: approximately £95-£175
At an average UK salon cut cost of £40, you’ll recoup this investment within three to five haircuts. After that, you’re spending only on occasional blade replacements or maintenance, typically £5-£15 annually. Over a decade, self-cutting saves most people between £1,500 and £2,500 compared to regular salon visits.
Seasonal Maintenance Timeline for Short Hair
Short hair grows faster than longer styles—you’ll notice growth within three to four weeks. Most people maintain their own short hair on a four to six week cycle. Here’s a realistic seasonal timeline for 2026:
Spring (March-May)
As daylight increases and temperatures rise, many people transition to shorter cuts for summer. If you’re starting your first cut, spring is ideal: you have time to practice before summer events. Growth is rapid during warmer months, so plan for cuts every three to four weeks.
Summer (June-August)
Ultra-short fades and crops are popular. If maintaining a fade, you’ll cut every three to four weeks. The advantage: outdoor lighting makes it easier to see what you’re doing. Many people develop genuine confidence with their technique during summer when they’re cutting frequently.
Autumn (September-November)
As temperatures drop, you might experiment with slightly longer styles—a bob or longer crop. Growth cycles extend to four to six weeks as hair growth naturally slows. Autumn is ideal for trying new short styles without the time pressure of summer.
Winter (December-February)
Shorter hair feels fresher in winter despite cold temperatures. You can plan around holiday schedules and special events. Winter lighting is dimmer, so ensure your setup is well-lit. Growth slows further; many people maintain the same cut for six weeks during winter.
Building Confidence: Your First Three Cuts
Your first cut won’t be salon-perfect, and that’s entirely normal. Here’s what to expect:
Cut One: You’ll be nervous. You’ll check the mirror constantly. You’ll probably be too cautious and leave hair slightly longer than intended. The result is serviceable but not flawless. This is success.
Cut Two: You understand the process now. You’re faster and more confident with clipper angles and scissor techniques. Blending is better. You’ve learned where your problematic growth patterns are.
Cut Three: You’re genuinely competent. Your cut looks intentional and neat. You’ve stopped second-guessing yourself on basic techniques. Friends might not realise you cut your own hair.
Many people reach genuine professional-looking results within five to eight cuts. The learning curve is real but manageable for anyone willing to practice and pay attention.
Frequently Asked Questions
Can I cut my own hair short if I have curly hair?
Yes, though curly hair requires slightly different technique. Always cut when damp, as curls change length significantly when they dry. Leave slightly more length than you think you need to account for curl spring-back. Use scissors and thinning shears more than clippers; straight clipper lines look harsh on curly hair. Consider cutting into the curl pattern rather than against it.
What’s the safest short style for a first-time DIY cut?
A uniform short crop (same length all over, achieved with one or two clipper guards) is safest. There’s no blending to worry about, no shaping to get wrong, and mistakes are barely noticeable. Aim for a number 2 or 3 guard, which keeps hair neat and masculine/feminine-neutral. Once you’ve done a few uniform cuts successfully, experiment with fades or textured tops.
How often should I replace clipper blades?
Quality blades last 12-18 months with regular use. You’ll notice performance decline when they feel hot, vibrate excessively, or pull hair slightly. Most replacement blades cost £5-£15. Sharpen and clean blades after each use to extend their life. Some people replace blades annually; others go two years. It depends on usage frequency and how fastidious you are about maintenance.
Is it possible to fix a bad haircut at home?
It depends on the mistake. If you’ve cut too short in one section, you must wait for regrowth—typically two to four weeks—before balancing the length across your whole head. If you’ve created harsh lines, blend with scissors or thinning shears. If the cut is truly botched, a professional stylist can usually salvage it, though this costs money. Most “bad” self-cuts are simply uneven or slightly shorter than expected, not genuinely unfixable.
Can I use regular kitchen scissors instead of barber scissors?
Technically, yes. Practically, no. Kitchen scissors have a blade geometry designed for cutting food, not hair. They create friction and pull hair rather than cutting cleanly, leaving bruised, frayed ends. The difference is immediately visible and feels worse to touch. Professional scissors cost £25-£40 and last years. The quality difference justifies the investment completely.
Moving Forward: Making It Your Routine
Learning how to cut your own hair short transforms from a daunting task into a normal part of self-care after your first successful cut. You’ll save significant money, gain independence from salon schedules, and develop genuine confidence in your appearance. Start with modest goals—a uniform short cut using clippers—rather than attempting complex fades or texture work immediately. Build your skills gradually over several cuts.
Keep your tools maintained, your workspace well-lit, and your hair damp. Watch your results carefully after each cut and adjust your technique accordingly. Within a few months, cutting your own short hair becomes automatic, freeing up time and money for other priorities. The investment in quality tools and an afternoon learning the basic technique pays dividends for years.
Add Comment