Contents:
- Understanding Hair Science and Moisture
- Preparing Your Hair Before You Start
- Choosing the Right Equipment
- What the Pros Know
- The Step-by-Step Blow-Drying Process
- Section Your Hair
- Rough Dry the Base
- Final Drying and Styling
- Techniques for Different Hair Types
- Fine or Thin Hair
- Thick or Coarse Hair
- Curly or Textured Hair
- Sustainability and Eco-Conscious Drying
- Common Mistakes to Avoid
- Frequently Asked Questions
- Moving Forward with Better Hair Health
You’ve just stepped out of the shower, wrapped your head in a towel, and now face the familiar dilemma: spend 20 minutes painstakingly blow-drying each section, or let your hair air-dry and hope it cooperates. Most people fall somewhere between these extremes, struggling through the process without truly understanding the mechanics behind it. The truth is, learning how to blow dry hair properly transforms this mundane task into a skill that delivers professional results every time.
Blow-drying isn’t merely about applying heat and wind to wet hair. It’s a precise process rooted in understanding how moisture, temperature, and airflow work together to shape and protect your hair structure. Professional stylists spend years perfecting techniques that seem effortless when executed correctly. The good news: you don’t need years of training to master the fundamentals.
Understanding Hair Science and Moisture
Before picking up a blow dryer, it helps to understand what happens to your hair when it gets wet. Hair is composed primarily of a protein called keratin, surrounded by a protective outer layer called the cuticle. When water penetrates the hair shaft, it weakens the hydrogen bonds that give hair its structure and strength. This is why wet hair stretches more easily and breaks more readily than dry hair.
The cuticle lies flat when dry and slightly raised when wet. As you blow-dry, you’re essentially closing these cuticles back down while reshaping the hair’s internal structure. This process, when done correctly, actually seals moisture into the hair shaft and creates a smoother surface that reflects light better—resulting in shinier hair. Conversely, rough or careless blow-drying can leave cuticles raised and roughed up, creating a dull, frizzy appearance.
Temperature matters significantly here. Most professional stylists use moderate heat rather than maximum heat settings. Research shows that excessive heat (above 160°C) can permanently damage hair proteins, whilst 120-140°C provides sufficient drying power without causing this damage. Your dryer’s speed setting is equally important; faster airflow can rough up cuticles, whilst slower speeds dry more gently.
Preparing Your Hair Before You Start
The foundation of successful blow-drying begins before you even switch on the device. Start by towel-drying thoroughly—this removes excess water and dramatically reduces drying time. Rather than rubbing vigorously (which damages cuticles), gently squeeze sections of hair within the towel, allowing it to absorb moisture naturally.
Next, apply a heat protectant product to damp hair. These products create a thin barrier between your hair and direct heat, reducing protein damage. Look for products containing silicones or natural oils like argan oil. Apply from mid-length to the ends, avoiding the scalp where oils are naturally produced. A typical application uses about 1-2 pumps for shoulder-length hair.
If your hair is particularly thick or curly, apply a leave-in conditioner or styling cream to provide slip and definition. This serves two functions: it helps the dryer’s airflow move through hair more smoothly, and it provides additional moisture that counteracts the drying effect of heat. A 50p-sized amount is usually sufficient for medium-length hair.
Choosing the Right Equipment
Not all blow dryers are created equal. Professional-grade dryers, typically priced between £60-£150, feature motors that run at higher wattages (1600-1800W) and produce more consistent, focused airflow. These dryers reduce drying time significantly—often by 30-40% compared to lower-wattage models—which means less overall heat exposure for your hair.
Key features to prioritize include an ionic function (which reduces frizz by neutralizing static charge), temperature control settings, and multiple speed options. Ionic dryers emit negative ions that break apart water molecules, allowing them to evaporate more quickly. This isn’t marketing hype; studies confirm that ionic dryers produce less frizz and static compared to conventional models.
The nozzle attachment matters too. A concentrator nozzle (the narrow attachment) directs airflow precisely where you want it, allowing better control and faster drying. For natural curls or textured hair, a diffuser attachment is invaluable—it distributes air more gently and helps maintain curl pattern.
What the Pros Know
Professional stylists always use a concentrator nozzle. It’s the single biggest factor separating amateur drying from salon-quality results. The focused airflow allows you to dry faster with less frizz and gives you directional control that’s simply impossible without it. Most professionals never switch between attachments mid-session—they commit to the concentrator nozzle for the entire process.
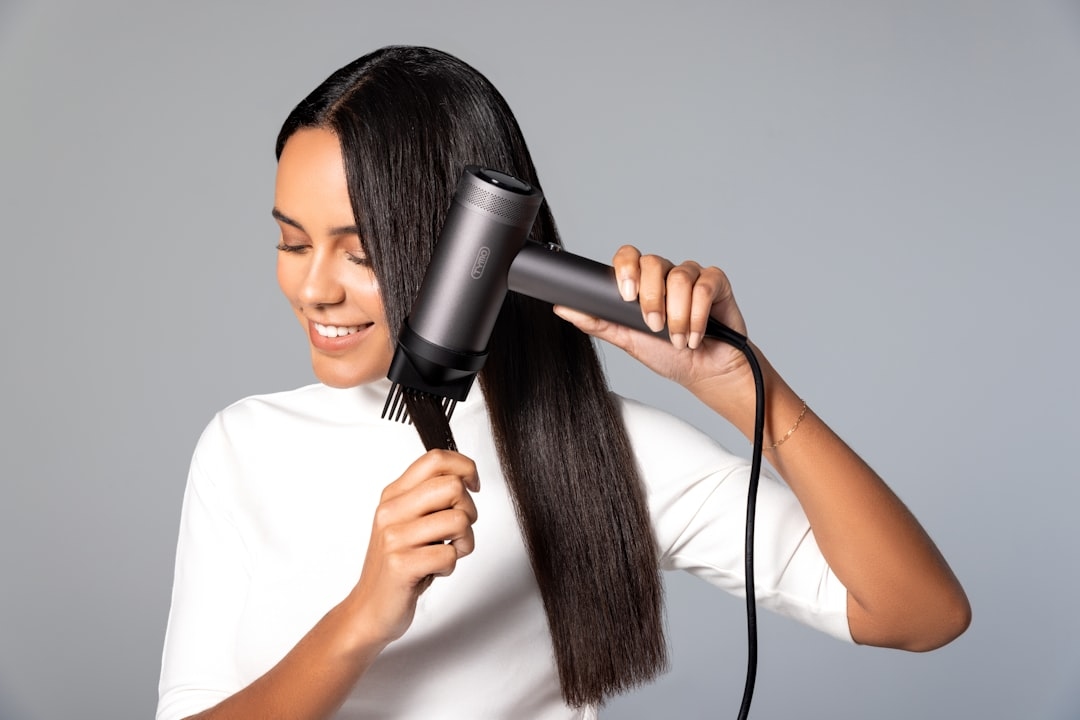
The Step-by-Step Blow-Drying Process
Section Your Hair
Divide damp hair into 4-6 manageable sections using clips. For most people, this means a top section, two sides, and a back section. The goal is to work with small enough sections that you can dry them thoroughly before moving on, without overwhelming yourself with too many sections. Start with the underside layers first—this allows you to dry the foundational layers whilst the upper sections air-dry slightly, giving you better control.
Rough Dry the Base
Begin with the back section, unclipping one sub-section at a time. Hold your dryer at a 45-degree angle (not perpendicular to your head) and move it in one direction, from root to end. This angled approach encourages cuticles to lay flat. Use medium heat and medium speed—not maximum settings. Rough dry until about 60-70% of the moisture is removed. You’re aiming for damp, not dripping, but not completely dry either.
This rough-drying phase shouldn’t take more than 5-7 minutes for shoulder-length hair. The goal is simply to remove excess water before precision styling. Many people skip this phase and jump straight to styling, which means fighting with overly wet hair and extending the drying process unnecessarily.
Final Drying and Styling
Once rough dried, you’re ready for the final phase. Unclip sections one at a time (still working from back to front) and dry thoroughly. Here’s where technique becomes crucial. Hold the dryer 15-20cm from your hair and move it constantly—never hold it stationary, as this concentrates heat in one spot and can cause damage or frizz.
Follow the direction of hair growth, working from root to end. At the very end of each section, you can briefly switch to cool shot (if your dryer has this setting) to seal the cuticles and add shine. This final cool burst lasts just 3-5 seconds but makes a noticeable difference in smoothness and shine.
For straight hair, maintain tension with a round brush or your fingers, pulling gently downward as you dry. For wavy or curly hair, you can use a diffuser attachment and scrunch upward whilst drying to encourage texture. Total time for this phase is typically 8-12 minutes depending on hair length and thickness.
Techniques for Different Hair Types
Fine or Thin Hair
Use lower heat settings and avoid applying product to the roots, which can weigh fine hair down. Work in smaller sections to ensure thorough drying without over-processing. Aim to dry roots first, then mid-lengths, then ends. This prioritizes the areas that need most volume and moisture retention.
Thick or Coarse Hair
Thicker hair benefits from higher wattage dryers and slightly higher heat settings (140-160°C range). Don’t rush the rough-drying phase—thoroughly removing excess moisture makes the final styling much easier. Using a leave-in conditioner isn’t optional for this hair type; it prevents frizz and makes the hair more manageable.
Curly or Textured Hair
Always use a diffuser attachment. Apply styling cream or curl-defining product to damp hair before drying. Rather than smoothing downward, use an upward scrunching motion with the diffuser, gathering hair toward your scalp. This encourages curls to form whilst drying rather than fighting against your hair’s natural texture. Drying time will be longer—expect 15-18 minutes for shoulder-length curly hair.
Sustainability and Eco-Conscious Drying
Blow-drying consumes significant energy; an average session uses 1400-1800 watts for 10-15 minutes. If you’re drying hair 3-4 times weekly, that’s roughly 10-14 kWh monthly from blow-drying alone. Here are practical ways to reduce environmental impact without sacrificing results:
- Invest in an ionic, high-efficiency dryer: Professional-grade ionic dryers reduce drying time by 30-40%, directly reducing energy consumption. The upfront cost of £80-£150 pays for itself within 18-24 months through reduced electricity usage.
- Rough dry with a microfibre towel first: Microfibre towels absorb water far more efficiently than cotton, reducing the wet weight of your hair before heat application. This simple step cuts drying time by 20-30%.
- Air-dry more frequently: If your lifestyle allows, alternate between blow-dried and air-dried days. Even adding one air-dry day weekly reduces your blow-drying energy consumption by roughly 15-20% annually.
- Maintain your dryer: Clean the filter monthly to ensure optimal airflow. A clogged filter forces the motor to work harder, increasing energy use by up to 25%.
Common Mistakes to Avoid
Starting with maximum heat and speed is the single most common error. This generates frizz, damages hair, and often takes longer because you’re fighting against roughed-up cuticles. Start with medium settings and increase only if necessary.
Holding the dryer perpendicular to your scalp (pointing straight down) forces air directly into the cuticle layer, raising it rather than sealing it. Always angle the dryer downward toward the direction hair grows.
Over-processing with product is another frequent mistake. More product doesn’t mean better results—it means heavier, greasier hair that looks limp. A 50p-sized amount of styling product is sufficient for most hair types and lengths.
Finally, many people dry their hair completely, then wonder why it looks dull and flat. Stopping when hair is 85-90% dry, then allowing the final 10-15% to air-dry naturally, often produces better results. This final air-drying phase is gentler and allows cuticles to settle more naturally.
Frequently Asked Questions
How often should I blow-dry my hair without causing damage?
Daily blow-drying with proper technique and heat protection rarely causes noticeable damage. However, limiting blow-drying to 4-5 times weekly reduces heat exposure significantly. If you must dry daily, ensure you’re using a heat protectant product and never exceed 140°C.
What’s the difference between ionic and non-ionic blow dryers?
Ionic dryers emit negative ions that break water molecules into smaller particles, enabling faster evaporation and reducing frizz. Non-ionic dryers simply apply heat and airflow without this ionic function. Studies confirm ionic dryers produce approximately 30% less frizz and dryness compared to conventional models, justifying the higher price.
Can I blow-dry wet hair directly from the shower without towel-drying first?
Technically yes, but it’s inefficient and tough on your hair. Towel-drying first removes approximately 50% of excess water, reducing total drying time by 40-50% and total heat exposure. This pre-drying step is the most effective way to minimize damage whilst achieving professional results.
How can I reduce frizz when blow-drying?
Four factors control frizz: use an ionic dryer (or one with ionic function), apply a smoothing serum before drying, angle your dryer downward rather than upward, and finish with a cool-shot burst to seal cuticles. The cool-shot finishing step alone reduces frizz noticeably even on humid days.
Is it better to blow-dry hair completely dry or leave it slightly damp?
Leaving hair 10-15% damp (slightly damp to the touch but not visibly wet) often produces better results than drying completely. This allows the final moisture to evaporate gradually, settling cuticles more naturally and reducing frizz. Complete drying sometimes produces a slightly harsh or overly smooth appearance, particularly on textured hair.
Moving Forward with Better Hair Health
Mastering how to blow dry hair isn’t about following rigid rules—it’s about understanding the physics behind the process and adapting technique to your hair’s unique characteristics. The investment in proper equipment, heat protectant products, and refined technique pays dividends not just in immediate results, but in long-term hair health.
Start by assessing your current approach: Are you using maximum heat unnecessarily? Could a concentrator nozzle improve your results? Is rough-drying eating into your time? Small adjustments often yield dramatic improvements. Track your results over 2-3 weeks as you refine your process, paying attention to shine, frizz reduction, and how long your style lasts.
The goal isn’t salon perfection every single day—that’s unrealistic and unsustainable. The goal is developing a reliable, efficient technique that works with your hair’s natural characteristics rather than against them. Once you’ve established that foundation, you’re free to experiment with styling techniques, products, and approaches that suit your lifestyle and preferences.
Add Comment